
Amazon Associates Disclosure We are a participant in the Amazon Services LLC Associates Program, an affiliate advertising program designed to provide a means for us to earn fees by linking to Amazon.com and affiliated sites.
Sous Vide Pork Belly Asian Style
Recipe and directions for Sous Vide Pork Belly with an Asian Style ginger orange marinade and sauce. Move over bacon, there is a new King in town!

Ingredients
This is probably one of my new favorite recipes to cook with my sous vide machine. It’s an easy recipe with fabulous results and you don’t need a whole lot of ingredients.
You only need onion (or green onions), ginger, garlic, soy sauce, rice wine vinegar, oranges, and some sesame oil. You’ll also need a good cut of pork belly.
Sourcing Pork Belly
Your mega-mart might have pork belly, but you might have to ask your butcher to find some for you. You can also visit your local Asian market.
Neither my local mega-mart nor Asian market carries pork belly on the regular, but I have access to a local farm that processes their own pigs. If you have access to such a place, I highly recommend you check them out.
I find that this kind of pork is far superior to anything you’ll find at your normal grocery store.
You’ll want a pork belly in the 2-3 lb range. The marinade goes a long way and should make enough from anywhere from 1-6 lbs of pork belly in total.
Instructions
Be sure to start this super early. I’m talking about one day early. It takes anywhere from 20-24 hours.
To start, take your onion, ginger, garlic, soy sauce, vinegar, zest of one orange, juice of two oranges, and some sesame oil.
To be honest, I never really measure out these ingredients, I just eyeball them.
You’ll want about 1/4 of an onion, 1-2 tbsp of ginger, two cloves of garlic, 1/4 cup of soy sauce, two tablespoons of rice wine vinegar, and sesame oil.
I don’t measure out how much I need because I try to keep this easy and I don’t want to pull out a bunch of measuring cups or measuring spoons.
Take all of those ingredients and toss them into a blender. Transfer the pork belly to either a heavy-duty freezer bag or vacuum seal bag. Add the marinade and push out all of the air and seal up your bag.
Temperature and Time
Preheat your sous vide setup to 150° F.
Place your pork belly into the sous vide water and let this cook for 20-24 hours. You can use a temperature range of 150-175° F, so you’ll want to experiment.
The higher the temperature the more braze-like the pork will come out to be. The pork belly ends up more steak-like at 150° F.
Also, your cooking times will shorten the higher you go.
If you cook at 175° F your cooking time will be as short as 8 hours, but again, you’re trading temperature and time for texture. It’s really about what you want.

After 24 hours, pull the pork belly from the hot water and let cool for about 5-10 minutes so you’re not scorching your hands handling the meat.

Remove the meat from the bag, but do not throw out the leftover marinade.
Put the marinade in a saucepan and begin to reduce the sauce. You’ll want to reduce it by half.

Remove the Skin After Cooking
You’ll notice in my photos that my pork belly isn’t the most attractive cut.
This is an end cut that I saved from a day of preparing bacon, but you’ll notice there are some hairs on the skin. You can remove the skin before sous vide, but I prefer to remove it after.
The fat under the skin will be super soft and you can cut it with just about any knife with ease. Our source of pork belly processes their meat as little as possible and I don’t care much for the hairs, so I remove the skin before finishing the meal.
If you get your meat from a local store, there is a good chance that they were able to get all of the hair off the pig and you can fry up skin side of your pork belly.

Crisping After Cooking
To finish the recipe, get a cast-iron skillet and add about 4 tablespoons of oil.
Heat on high until screaming hot and the oil begins to smoke.
Cook the pork belly fat side down until golden brown. Skin side down if you didn’t remove the skin.
How to Serve
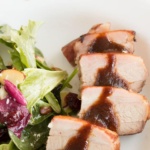
Transfer your pork belly to your dish and serve with your favorite side dish.
This is super-rich, so we recommend you go with a light salad with a vinegar-based dressing.

Or you could even go with a lightly dressed pasta salad.
Sauce
It is best to use the same flavors that it was marinaded in. Simply cook the marinade in a saucepan over medium heat until it has reduced by at least half.
The longer the marinade is allowed to cook the thicker and more concentrated it will get.
I find this to be super delicious without a sauce, but you can use the reduced marinade to dribble over the top.
You can also use it as a dipping sauce.
MORE SOUS VIDE RECIPES YOU DON’T WANT TO MISS

FOLLOW US ON SOCIAL MEDIA AND SHARE THIS RECIPE
SIGN UP TO RECEIVE NOTIFICATIONS AND NEVER MISS AN UPDATE

Asian Style Sous Vide Pork Belly
Ingredients
- 1/4 of white onion or 5 stalks of green onion
- 2 tbsp. freshly grated ginger
- 1/4 cup soy sauce
- 2 tbsp. rice wine vinegar
- Zest of one orange
- Juice of two oranges
- 1 tbsp. sesame oil
- 2 to 3- pound slab of pork belly
- 1 tbsp. vegetable oil
Instructions
- Prepare and preheat your sous vide machine to 150° F.
- Blend the onion, ginger, soy sauce, vinegar, zest, and orange juice in a blender or food processor until smooth.
- Place the marinade and pork belly into a sous vide, vacuum, or zip-loc freezer baggie and remove as much as air possible.
- Place in the sous vide machine and cook for 20-24 hours.
- Remove the belly from the sous vide machine.
- Remove the bell from the bag and reserve the juices and marande.
- Place the marinade and juices in a saucepot and reduce by half (or more if you want it more intense and thick) to make a sauce.
- Remove the skin of the pork belly with a knife (optional)
- Heat a pan or cast-iron skillet over medium-high heat and add a tablespoon of vegetable oil or other high temperature fat.
- Sear the fat side (or skin side if you left the skin on) until golden brown.
- Plate the pork belly and either drizzle with the belly with the marinade sauce or service on the side.
Notes

Nutrition
Nutrition information is automatically calculated and may vary based on exact ingredients used. For accuracy, consult a registered dietitian or nutritionist.