
Amazon Associates Disclosure We are a participant in the Amazon Services LLC Associates Program, an affiliate advertising program designed to provide a means for us to earn fees by linking to Amazon.com and affiliated sites.
White Forest Cake
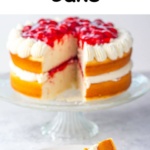
This White Forest Cake recipe is a delicious white sponge cake with ermine frosting and a cherry filling that your guests will love! It’s perfect for those who can’t eat or don’t like traditional Black Forest Cake.

It’s gorgeous with bright red cherry pie filling set against the white cooked frosting. This cake will be the star of any special occasion. It’s easy to make because it starts like most vanilla cake desserts in my rotation, with a white wedding cake recipe as the base. Yes, I use a cake mix! It is still one of my top and highest-rated cake recipes.
I use extra vanilla extract in this version because I don’t use almond extract for it. Feel free to use it if you love almond extract and cherries together – they certainly compliment to each other!
What is Ermine Frosting?
Ermine frosting is an old-fashioned cooked frosting where flour is cooked with milk, cooled, and then mixed with sugar and butter. It’s not as sweet as a buttercream frosting, but buttercream is an acceptable substitution if you like super sweet cakes.
I prefer ermine on this cake and my red velvet cakes because it isn’t overwhelming and allows other flavors to come through.
Ingredients
Cake
- White Cake mix – any white cake mix works in this recipe. I usually buy whatever brand is on sale.
- All-purpose flour – you can use bleached or unbleached. I use them interchangeably.
- Sugar – use white granulated sugar
- Egg whites – most box recipes call for 4 egg whites. You can substitute 3 whole eggs if you prefer, but the cake will be more yellow.
- Greek yogurt – I prefer Greek yogurt, but you can substitute it with plain yogurt, or sour cream.
- Vegetable oil – any light-tasting oil will work.
- Vanilla extract – Always use a quality vanilla extract that fits into your budget
Filling Ingredient
- Cherry pie filling – I cheat and use canned pie filling. If you want to make your own filling, you will need about 1 1/2 cups of fruit pie filling.
Ermine Frosting/7 minute Frosting
- Milk – you can use any milk or even half and half
- All-purpose flour
- Granulated white sugar
- Salted butter
- Solid shortening
- Vanilla extract
Substitutions and Additions
No worries if you don’t have all these ingredients on hand or are catering to dietary restrictions. There are some handy substitutions you can use:
- White Cake mix: If you’re feeling adventurous, why not try making your own from scratch? You can try the silver white cake recipe I use in my mini cupcakes.
- All-purpose flour: Gluten-free flour can be used in a pinch for those who need to avoid gluten, make sure you are using a gluten-free cake mix as well.
- Sugar: If you’re trying to reduce refined sugar, coconut sugar or a sugar substitute like Stevia might be a good fit. You will need to follow manufacturer directions for using alternative sweeteners in baking, I am no expert in that.
- Egg whites: For a vegan version or eggless white forest cake, you could use a flax “egg” instead. Mix 1 tablespoon of ground flaxseed with 3 tablespoons of water for each egg you replace.
- Greek yogurt: Sour cream is an acceptable substitute in this recipe. If you’re dairy-free, a dairy-free yogurt or sour cream will also work.
- Vegetable oil: Feel free to use applesauce or mashed banana for a lower-fat option. Bananas will alter the flavor though.
If cherries aren’t your thing, or if you simply want to shake things up, why not go for a different fruit filling? Apple pie filling can perfectly replace cherry pie filling, giving your cake a hint of a classic apple pie flavor.
Or, if you’re into tropical fruits, a pineapple or a mango filling could be a fun twist! If you’re a berry lover, raspberry or blueberry pie filling would add a lovely tartness to go with the sweet white cake.
How To Make White Forest Cake
Preparing the Cake
- Preheat your oven to 325°F and prepare two 9-inch round cake pans, greasing or spraying them with baking spray and lining the bottoms with parchment paper. I usually coat the parchment paper after lining the pan for an extra level of protection.
- Take a large bowl and combine your dry ingredients: cake mix, flour, and sugar, stirring until blended. Next, add the water, yogurt, egg whites, oil, and vanilla to the mix.
- Switch the electric mixer to medium speed and let it run for two minutes. Evenly distribute the now smooth batter between your prepared pans with a rubber spatula.
- Bake these in your preheated oven for about 35 minutes. To ensure they’re perfectly baked, perform the toothpick test by inserting it into the center of the cakes. They’re ready if it comes out clean with just a few crumbs sticking (and no wet batter). If not, continue baking, checking every 3 to 5 minutes.
- When the cakes are done baking, take them out of the oven and let them cool in their pans for about 10 minutes. Then, turn them out onto a wire rack and remove the pans.
- Ensure the cakes have completely cooled down before preparing your frosting.
Frosting
1. Start by combining your flour and milk in a small saucepan.
2. Heat it over medium heat until it begins to boil. Allow it to boil for a minute so it gets nice and thick.

3. Once done, remove it from the heat and cover it with some plastic wrap. Let it sit until it’s completely cool.

4. Bring your granulated sugar, butter, and shortening together in a large mixing bowl. Whip everything up with an electric mixer until it’s all blended and has a creamy quality.

5. Finally, add the flour mixture you cooled earlier and some vanilla extract. Beat it all up until you’re left with a smooth and fluffy frosting, ensuring no lumps are left.
Putting the Cake Together
1. First, trim off any substantial humps from the cakes. Position one cake, trimmed side upwards, on your chosen serving dish.
2. Place one of the cake layers on a cake stand with the flat side down.
3. Spread a thin layer of frosting over the top of the layer.

4. Pipe a border around a piping bag. Within this frosty ring, spoon half of your cherry pie filling.

5. Now, it’s time for your second cake layer – place it flat side down on top of the frosting and filling.

6. Spread another thin layer of frosting over the top and pipe out the rest of your frosting around the edge of the top layer. Finish up by spooning the remaining cherry pie filling into the center.

Recipe Tips
- Cake Mix: Do not use the ingredients listed on the box in addition to the ingredients in the recipe; just follow the recipe!
- Frosting: You can use any frosting you like; we prefer it with Ermine frosting; it isn’t as sweet as others.
- Chill those cakes: Before you get started with the frosting, it’s a good idea to let your cakes chill in the fridge for a bit. This helps them firm up, making them easier to frost and less likely to crumble.
- Room-temp ingredients are best: Trust me, using room-temperature ingredients can make a big difference. It helps everything blend together better, giving you a smoother, lighter cake batter.
- Place the layers properly: You want to keep the flat (bottom) part of each cake in the center when layering. This will help keep your layers nice and straight.
- Don’t rush the frosting: Take your time when mixing your frosting. The longer you beat it, the fluffier it’ll be. You’re looking for a light, cloud-like quality.
- Decorate with creativity: Feel free to get creative with the presentation! A few white chocolate shavings on top of the cake, or even some fresh cherries, could make it look like it’s straight from a bakery’s display window!
- Piping Bag: If you don’t have a piping bag, you can use a plastic baggie. Squeeze the frosting in to the corner of the baggie and snip off the corner.

Storage
This cake can be stored at room temperature for up to 3 days and in the refrigerator for up to 5 days.
To keep the cake fresh, use a cake plate with a dome or wrap with plastic wrap. Plastic wrap is going to stick to the frosting and pie filling.
To freeze, slice cakes into individual slices and freeze. Once frozen, wrap each piece tightly in plastic wrap or in an airtight container or freezer bag. Place wrapped cake slices into an airtight freezer container. Use within 3 months.
Remove the cake slices from the container and wrap before thawing.

FAQs
Can I Use a Different Type of Fruit Filling?
Absolutely! This recipe is versatile. You can replace cherry pie filling with your favorite fruit filling. Just bear in mind the color and flavor of the cake will depend on the fruit filling you choose.
Can I Make This Cake Gluten-Free?
Sure, you can! Simply replace the regular cake mix and flour with gluten-free versions. However, check the other ingredient labels to ensure they are gluten-free too.
Can This Cake Be Made Ahead of Time?
You bet! This cake tastes even better after it sits for a day. You can prepare this delicious cake and the frosting a day in advance, store them separately in the refrigerator, and assemble them just before serving.
How Can I Prevent the Cake From Sticking to the Pan?
Ensure you grease your pan well and line the bottom with parchment paper. After baking, let the cakes cool in the pans for about 10 minutes before turning them out onto a cooling rack.
My Frosting Isn’t Fluffy. What Did I Do Wrong?
Ensure that all your ingredients are at room temperature before you start. Also, take your time with the process. Take your time to beat the frosting until it’s light and fluffy. The longer you beat it, the fluffier it will be.

MORE CHERRY RECIPES YOU’LL LOVE


FOLLOW US ON SOCIAL MEDIA AND SAVE THIS RECIPE
SIGN UP TO RECEIVE NOTIFICATIONS AND NEVER MISS AN UPDATE

Super Easy White Forest Cake
Ingredients
Cake
- 1 White Cake mix
- 1 cup all-purpose flour
- 1 cup granulated white sugar
- 4 large egg whites
- 1 1/3 cups water
- 1 cup plain Greek yogurt or sour cream
- 2 tablespoon vegetable oil
- 1 tablespoon vanilla extract
- 21 ounces cherry pie filling
Ermine Frosting/7 minute frosting
- 1 cup milk
- 1/3 cup all-purpose flour
- 1 cup granulated white sugar
- 1/2 cup salted butter softened
- 1/2 cup solid shortening
- 1 teaspoon vanilla extract
Instructions
CAKE
- Heat your oven to 325°F.
- Get two round 9-inch cake pans. Spray them with cooking spray and put a piece of parchment paper on the bottom of each.
- In a big bowl, put the cake mix, flour, and sugar.
- Mix it slowly until it’s just mixed together.
- Now, add water, yogurt, egg whites, oil, and vanilla.
- Turn the mixer to medium speed and mix for two minutes.
- Pour the batter into the pans. Try to make it even in both pans.
- Put the pans in the hot oven and bake for 35 minutes. Use a toothpick to check if they’re ready. Stick it in the middle, and if it comes out clean with just a few crumbs (but not wet batter), they’re done. If not, keep checking every 3 to 5 minutes until they are.
- When they’re done, take them out and let them cool for about 10 minutes.
- Turn the cakes upside down onto a cooling rack and take off the pans.
- Allow the cakes to cool completely before making the frosting.
FROSTING
- In a small saucepan, mix the flour and milk.
- Cook over medium heat until boiling.
- Boil for one minute to thicken the mixture.
- Remove it from the heat and cover it with plastic wrap.
- Allow the mixture to cool completely before proceeding.
- Add the granulated sugar, butter, and shortening to a large mixing bowl.
- Beat ingredients together until they are evenly combined and creamy.
- Add the cooled flour mixture and vanilla extract to the frosting and beat until everything is light and fluffy with no lumps remaining.
ASSEMBLY
- Trim any large domes off the cakes.
- Place on cake with the flat side up onto your serving plate.
- Using half of the frosting, spread a thin layer of icing on the cake and pipe a ring of frosting around the edge of the cake.
- Fill the frosting ring with half of the cherry pie filling.
- Top with the other cake, cut side down over the frosting and filling.
- Pipe the remaining frosting around the top of the second layer.
- Fill with the center with the remaining cherry pie filling.
Notes
- Do not use the ingredients listed on the box in addition to the ingredients in the recipe, just follow the recipe!
- You can use any frosting you like, we prefer it with Ermine frosting, it isn’t as sweet as others.
- Use any pie filling flavor you like. The darker ones like cherry, strawberry, blackberry, and blueberry are the best for contrasting against the white cake.
- This cake can be stored at room temperature for up to 3 days and in the refrigerator for up to 5 days. To keep the cake fresh, use a cake plate with a dome, or wrap with plastic wrap. Plastic wrap is going to stick to the frosting and pie filling.
- To freeze, slice cakes into individual slices and freeze. Once frozen, wrap each piece tightly in plastic wrap or place into a freezer baggies. Place wrapped cake slices into an airtight freezer container. Use within 3 months.
- To thaw, remove the cake slices from the container and wrapping before thawing.

Nutrition
Nutrition information is automatically calculated and may vary based on exact ingredients used. For accuracy, consult a registered dietitian or nutritionist.
This recipe was written and tested by a human.
Editor: Oliver Baysinger